后台
1.Menu 商品
1.1 Add Product 添加商品
1.1.1 Product image management 商品图片管理
1.1.2 Main dish as set meal name? 商品名是否进厨房
1.1.3 Members Discount Setting 会员折扣管理
1.2 Batch lmport 批量导入商品
1.3 How to batch operate goods 如何批量操作商品
1.4 sort management 分类管理
1.5 Customized package at the cash register 收银台自定义套餐
1.6 库存管理
1.6.1 快速操作商品库存
1.6.2 如何操作入库
1.6.3 如何操作损耗
1.6.4如何盘点库存
1.6.5 如何查看操作记录
1.7 Purchase Management 采购管理
1.7.1 Supplier Category 供应商管理
1.7.3 Status Setting 状态分类
1.7.4 Add Purchase Order 新增采购单
1.7.4 Edit Purchase Order Status 编辑采购单状态
1.7.5 Check the purchase order 查看采购订单详情
2.Members 会员
2.1 Member management 会员管理
2.1.1 快速查找会员
2.1.2 编辑用户信息
2.1.3 商业积分/消费积分修改
2.1.4 会员详情
2.2 Level management 等级管理
2.2.1全局设置
2.2.2新增等级
2..2.3设置等级福利
2.3消费积分管理
2.3.1 Adjusted points Settings 消费积分设置
2.3.2 消费积分获取和抵扣
2.3.3 Points validity perio 积分有效期
2.4 商业积分明细
2.4.1 充值设置
2.4.2 充值套餐
3. Statistics 统计
3.2 Members 会员统计
3.1 Sales 销售统计
4. Finance 财务
4.1 Details 资产总览
4.2 Deposit List 押金列表
4.3 SMS Balance 短信余额
4.4.1 SMS recharge 短信充值
4.4.2 Usage Record 使用记录
4.4.3 Topup Record 充值记录
4.4 GST Statistics GST统计
4.5 Recharge statistics 充值统计
4.6 ENT
4.6.1 Transaction Details 交易明细
4.6.2 Personnel Details 人员明细
4.7 钱箱日志
4.8 出入库
4.8.1 Stock Out Statistics
4.8.2 Stock In Statistics 入库统计
5.Plug-ins 插件
Cashier Desk 收银台
1. Cashier 收银员
2. Basic settings 基础设置
3. Function Setting 功能设置
4. POS Cashier POS收银端
KIOSK 自助点餐机
Settings 设置
graphics List 广告图列表
Android System 安卓系统
Delivery Service 外卖配送
Product maps 商品映射
Promotion Voucher Personalized Link 专属优惠券链接
Selling vouchers on TikTok TikTok卖券
Receive Promotion Voucher 领取优惠券
TikTok food reviewer TikTok 探店达人
如何配置AI老客户召回
1. 选择发送方式
2. 怎么配置后台参数
3.常见问题
AI加购推荐
1.人工推荐设置
2.智能推荐设置
3.加购设置
4.常见问题
PR Marketing/PR Guest-Bringing 营销/公关带客
PR settings PR设置
cashier desk open PR 收银台开启PR入口
View customer data 查看带客数据
Account/权限
Role management 角色管理
Administrator 管理员列表
Amfuture integrates with Xero Amfuture对接Xero
How to Authorize Xero 如何授权Xero
How to declare GST 如何申报GST
Frequently Asked Questions (FAQ) 常见问题
常见问题
Create an Open item 制作Open item
Change the product picture 更换商品图片
Kds调整成先吃后付
Adjust the language of the receipt 调整小票语言
Product additive configuration 商品加料配置
1.Basic setting 基础设置
2.Frequently asked questions常见问题
3.Common cases 常见案例
4. The product is simultaneously added with other ingredients 商品同步成其他加料
Apply change to selection 批量同步商品加料
Deliver model 外卖模式
Manual Entry of Delivery Orders 手动输入外卖订单
Grab Delivery System Integration Grab 平台系统对接
Delivery Service 商家自配送外卖
Amfuture MCP 对接与 Skills 安装指南(对话式 · 一键复制版)
1. 登录与首页
-
+
首页
How to Authorize Xero 如何授权Xero
> This document focuses on the initial setup and verification of the Xero integration. You will learn how to authorize the connection and understand the automated daily data synchronization logic.</br>本文档重点介绍 Xero 对接的初始设置与验证流程。您将学习如何授权系统连接,并了解每日数据自动同步的底层逻辑。 #### 1. Xero Integration & Authorization Xero 系统对接与授权 The initial setup requires authorizing our system to communicate with your Xero account. This is a secure, one-time process. <br> 初始设置需要授权我们的系统与您的 Xero 账户进行通信。这是一个安全的、一次性的过程。 1. **Obtain the Integration URL (获取对接链接)**: Please contact our technical support team to request your unique Xero integration URL. Open this URL in your web browser. <br> 1. **获取对接链接**:请联系我们的技术支持团队索取您专属的 Xero 对接 URL。在您的网页浏览器中打开此 URL。 2. **Log in to Xero (登录 Xero)**: If you are not already logged in, the system will prompt you to enter your Xero admin credentials. <br> 2. **登录 Xero**:如果您尚未登录,系统会提示您输入 Xero 管理员凭证。 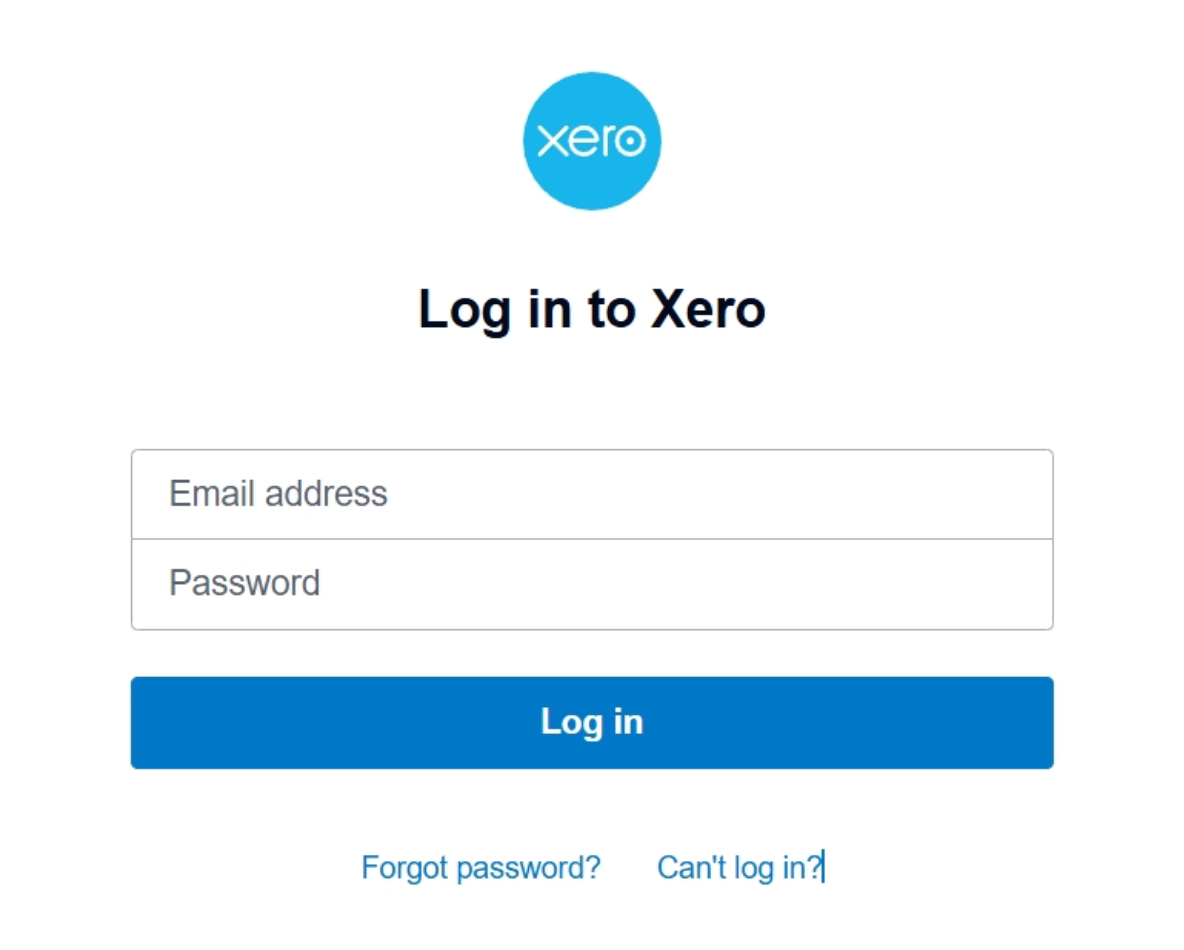 3. **Select an Organisation (选择组织机构)**: On the authorization screen, click the **Select an organisation** dropdown menu and choose the specific business entity you want to link to your POS. <br> 3. **选择组织机构**:在授权界面上,点击 **Select an organisation (选择一个组织)** 下拉菜单,选择您希望与 POS 关联的具体企业实体。 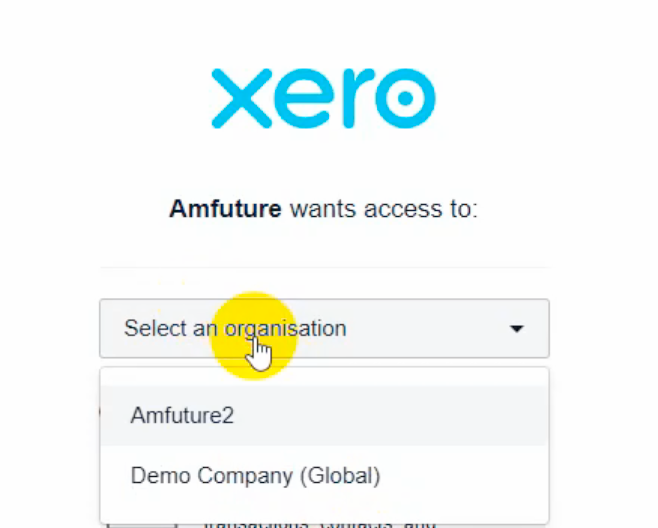 4. **Allow Access (授予访问权限)**: Click the blue **Allow access** button at the bottom to proceed. <br> 4. **授予访问权限**:点击底部蓝色的 **Allow access (允许访问)** 按钮继续。 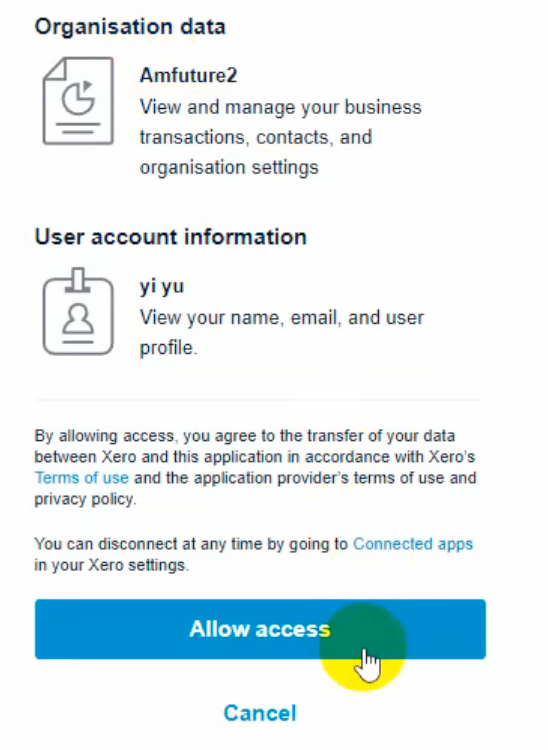 5. **Authorization Successful (授权成功)**: A success page will be displayed, confirming that the data link between the systems has been successfully established. <br> 5. **授权成功**:系统将显示一个成功页面,确认两个系统之间的数据连接已成功建立。 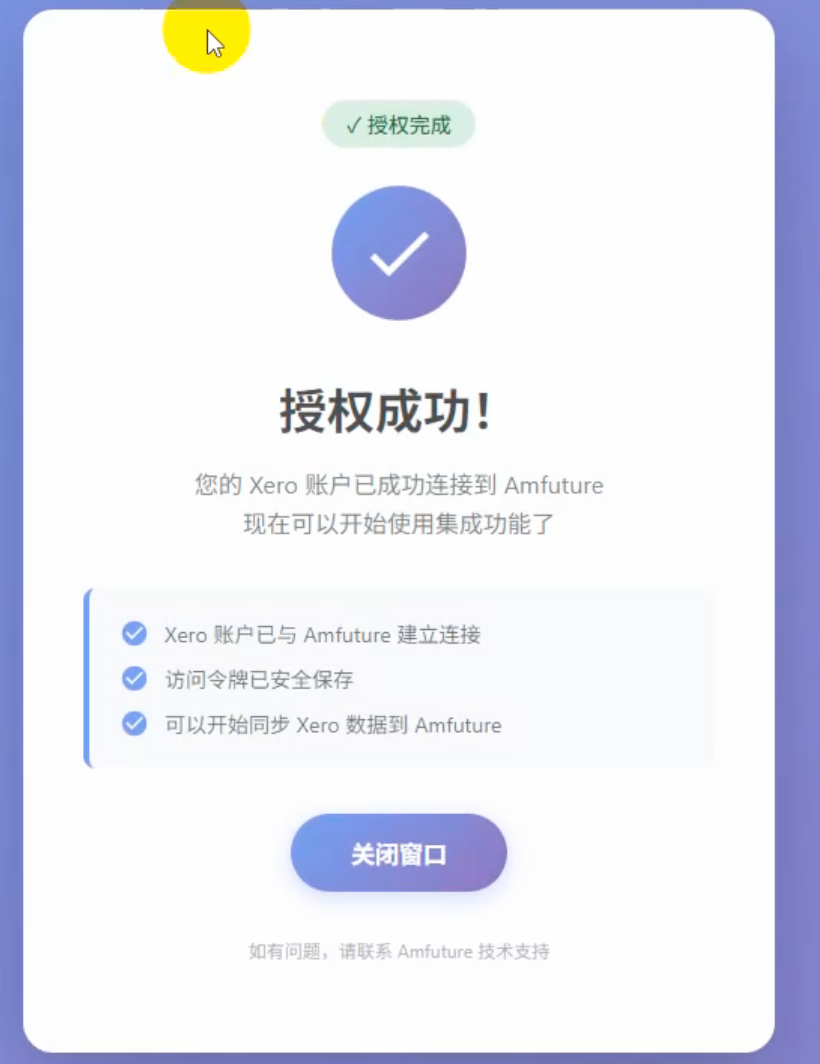 #### 2. Verifying the Connection & Sync Logic 验证对接结果与同步逻辑 After the authorization is completed, please log in to the Xero system with the same account and verify the settings. <br> 授权完成后,请打开Xero系统登录相同的账户,验证设置。 1. **Check Contacts (检查联系人)**: In Xero, navigate to **Contacts -> All contacts** on the top menu. You should see a newly created contact automatically named **POS Daily Sales**. <br> 1. **检查联系人**:在 Xero 中,导航至顶部菜单的 **Contacts (联系人) -> All contacts (所有联系人)**。您应该能看到一个系统自动创建的、名为 **POS Daily Sales** 的新联系人。  2. **Check Invoices (检查发票)**: <br> * **Where to view (查看位置)**: Navigate to **Sales -> Invoices** on the Xero top menu. <br> **查看位置**:在 Xero 顶部菜单中导航至 **Sales (销售) -> Invoices (发票)**。 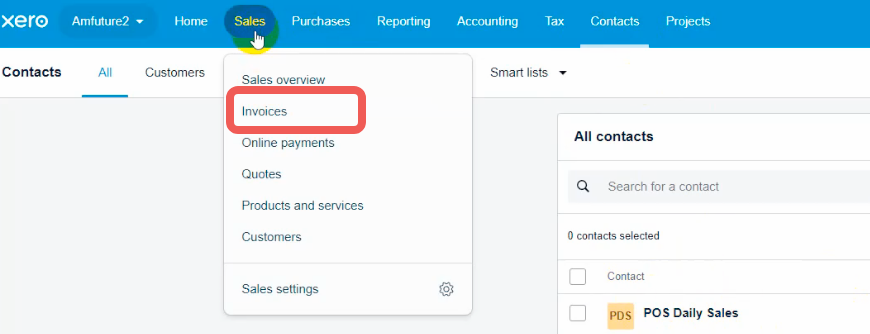 * **Sync Logic (同步说明)**: Initially, this section is empty. After a successful connection, our system automatically syncs data every day at **3:10 AM**. It aggregates all orders from the previous day (00:00:00 to 23:59:59) into a single invoice and pushes it under the "POS Daily Sales" contact. (**If there are no orders on that day, no invoice will be generated.**)<br> **同步说明**:默认情况下此处为空。关联成功后,系统会在每天凌晨 **3:10** 自动同步,将前一天 (00:00:00 至 23:59:59) 的所有订单金额进行总和,并在“POS Daily Sales”联系人名下生成一张该日的合并发票(**如果当天没有订单,将不会生成invoice**)。 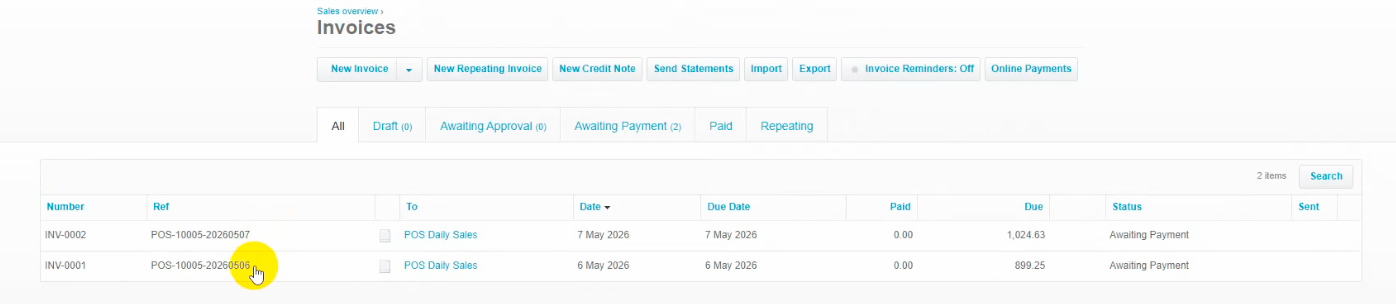
pos
2026年5月14日 18:09
转发文档
收藏文档
上一篇
下一篇
手机扫码
复制链接
手机扫一扫转发分享
复制链接
Markdown文件
PDF文档(打印)
分享
链接
类型
密码
更新密码