后台
1.Menu 商品
1.1 Add Product 添加商品
1.1.1 Product image management 商品图片管理
1.1.2 Main dish as set meal name? 商品名是否进厨房
1.1.3 Members Discount Setting 会员折扣管理
1.2 Batch lmport 批量导入商品
1.3 How to batch operate goods 如何批量操作商品
1.4 sort management 分类管理
1.5 Customized package at the cash register 收银台自定义套餐
1.6 库存管理
1.6.1 快速操作商品库存
1.6.2 如何操作入库
1.6.3 如何操作损耗
1.6.4如何盘点库存
1.6.5 如何查看操作记录
1.7 Purchase Management 采购管理
1.7.1 Supplier Category 供应商管理
1.7.3 Status Setting 状态分类
1.7.4 Add Purchase Order 新增采购单
1.7.4 Edit Purchase Order Status 编辑采购单状态
1.7.5 Check the purchase order 查看采购订单详情
2.Members 会员
2.1 Member management 会员管理
2.1.1 快速查找会员
2.1.2 编辑用户信息
2.1.3 商业积分/消费积分修改
2.1.4 会员详情
2.2 Level management 等级管理
2.2.1全局设置
2.2.2新增等级
2..2.3设置等级福利
2.3消费积分管理
2.3.1 Adjusted points Settings 消费积分设置
2.3.2 消费积分获取和抵扣
2.3.3 Points validity perio 积分有效期
2.4 商业积分明细
2.4.1 充值设置
2.4.2 充值套餐
3. Statistics 统计
3.2 Members 会员统计
3.1 Sales 销售统计
4. Finance 财务
4.1 Details 资产总览
4.2 Deposit List 押金列表
4.3 SMS Balance 短信余额
4.4.1 SMS recharge 短信充值
4.4.2 Usage Record 使用记录
4.4.3 Topup Record 充值记录
4.4 GST Statistics GST统计
4.5 Recharge statistics 充值统计
4.6 ENT
4.6.1 Transaction Details 交易明细
4.6.2 Personnel Details 人员明细
4.7 钱箱日志
4.8 出入库
4.8.1 Stock Out Statistics
4.8.2 Stock In Statistics 入库统计
5.Plug-ins 插件
Cashier Desk 收银台
1. Cashier 收银员
2. Basic settings 基础设置
3. Function Setting 功能设置
4. POS Cashier POS收银端
KIOSK 自助点餐机
Settings 设置
graphics List 广告图列表
Android System 安卓系统
Delivery Service 外卖配送
Product maps 商品映射
Promotion Voucher Personalized Link 专属优惠券链接
Selling vouchers on TikTok TikTok卖券
Receive Promotion Voucher 领取优惠券
TikTok food reviewer TikTok 探店达人
如何配置AI老客户召回
1. 选择发送方式
2. 怎么配置后台参数
3.常见问题
AI加购推荐
1.人工推荐设置
2.智能推荐设置
3.加购设置
4.常见问题
PR Marketing/PR Guest-Bringing 营销/公关带客
PR settings PR设置
cashier desk open PR 收银台开启PR入口
View customer data 查看带客数据
Account/权限
Role management 角色管理
Administrator 管理员列表
Amfuture integrates with Xero Amfuture对接Xero
How to Authorize Xero 如何授权Xero
How to declare GST 如何申报GST
Frequently Asked Questions (FAQ) 常见问题
常见问题
Create an Open item 制作Open item
Change the product picture 更换商品图片
Kds调整成先吃后付
Adjust the language of the receipt 调整小票语言
Product additive configuration 商品加料配置
1.Basic setting 基础设置
2.Frequently asked questions常见问题
3.Common cases 常见案例
4. The product is simultaneously added with other ingredients 商品同步成其他加料
Apply change to selection 批量同步商品加料
Deliver model 外卖模式
Manual Entry of Delivery Orders 手动输入外卖订单
Grab Delivery System Integration Grab 平台系统对接
Delivery Service 商家自配送外卖
Amfuture MCP 对接与 Skills 安装指南(对话式 · 一键复制版)
1. 登录与首页
-
+
首页
1.7.4 Add Purchase Order 新增采购单
> Welcome to Procurement Management Setup. Establishing a robust procurement workflow requires three critical phases: 1. Supplier Management, 2. Status Settings, and 3. Purchase Order Operations. <br> 欢迎来到采购管理设置。建立一个完善的采购工作流需要经历三个关键阶段:1. 供应商管理,2. 状态设置,3. 采购单实操。 > > This third document focuses on Purchase Order Operations. Here, you will learn how to create and manage POs, understand Headquarter vs. Branch permissions, and utilize dynamic status nodes for flexible recording. <br> 这第三份文档将聚焦于“采购单实操”。在此,您将学习如何创建和管理采购单,了解总店与分店的权限差异,并利用动态状态节点进行灵活的单据记录。 #### 3.1 Purchase Order Overview & Permissions 采购单概览与权限控制 1. **Navigate to Order Preview (进入订单预览)**: Go to the Purchase Order module. This page displays the list of all procurement documents. <br> 1. **进入订单预览 (Order Preview)**:前往采购单模块。此页面显示所有采购单据的列表。 2. **Permission Control (权限控制)**: The system automatically filters visibility based on your account level: <br> 2. **权限控制 (Permission Control)**:系统会根据您的账号级别自动过滤可见内容: * **Headquarters (总店)**: Has full visibility of all branches' POs and has the authority to create new purchase orders for any specific branch. <br> **总店 (Headquarters)**:拥有所有分店采购单的完整查看权限,并且有权为任何指定分店创建(代下)新的采购单。 * **Branch (分店)**: Can only view, create, and modify purchase orders that strictly belong to their own outlet. <br> **分店 (Branch)**:只能查看、创建和修改严格属于本门店的采购订单。 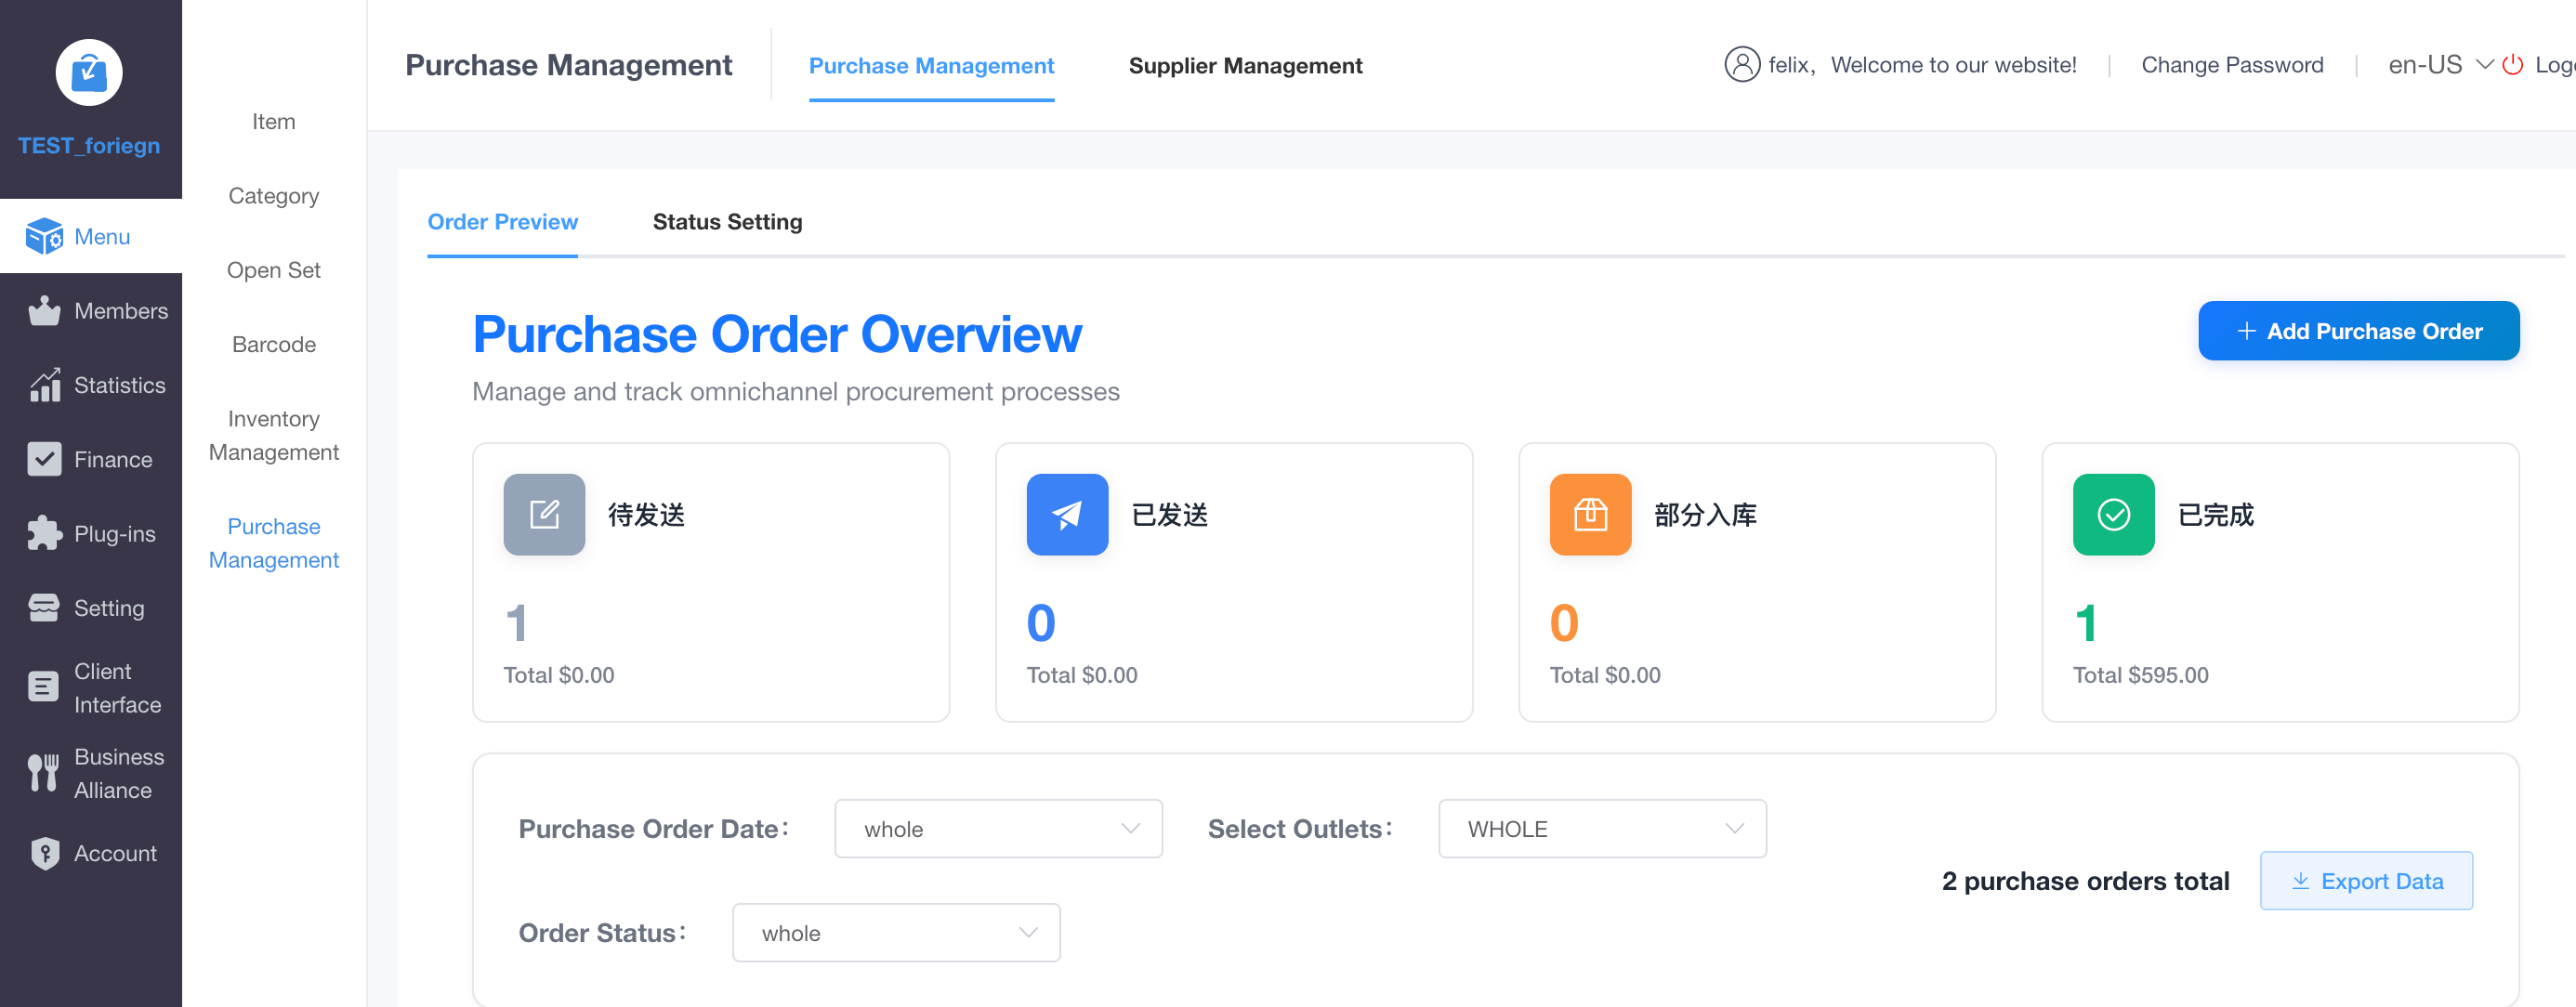 #### 3.2 Adding a Purchase Order 新增采购单 On the Order Preview page, click **Add Purchase Order (新增采购单)** to open the creation form. The form is logically divided into five main sections. <br> 在订单预览页面,点击 **Add Purchase Order (新增采购单)** 打开创建表单。该表单在逻辑上分为五个主要区块。  **Section 1: Basic Information 基本信息** This section defines the core attributes, routing, and lifecycle stage of the order. <br> 本区块定义了订单的核心属性、流转去向以及生命周期阶段。 | Field/Action <br> 字段/操作名称 | Explanation <br> 含义与操作解析 | | :--- | :--- | | **Date** <br> 日期 | **Required.** The creation date of the purchase order. <br> **必填。** 采购单的创建日期。 | | **Target Inventory Store** <br> 目标库存门店 | **Required.** Select the destination outlet for the goods. <br> *Permission Logic (权限逻辑):* HQ users can select any branch. Branch users can only see and select their own store. <br> **必填。** 选择货物的目的地门店。<br> *权限逻辑:* 总店用户可以选择任何分店。分店用户只能看到并选择自己的门店。 | | **Status** <br> 状态选择 | **Required.** Manually set the current workflow stage. <br> *Dynamic Logic (动态逻辑):* The fields required in the rest of this form will change dynamically based on the "Operation Nodes" assigned to this status in the backend. Useful for back-filling (特殊情况补录). <br> **必填。** 手动设置当前的工作流阶段。<br> *动态逻辑:* 表单其余部分的必填项,将根据后台分配给该状态的“操作节点”发生动态改变。适用于特殊情况补录。 | | **Delivery Address** <br> 送货地址 | Choose **Default Store Address (默认门店地址)** to use the registered system address, or select **Use Other Address (使用其他地址)** to manually enter a different destination. <br> 选择 **默认门店地址** 以使用系统注册地址,或选择 **使用其他地址** 手动输入不同的目的地。 | 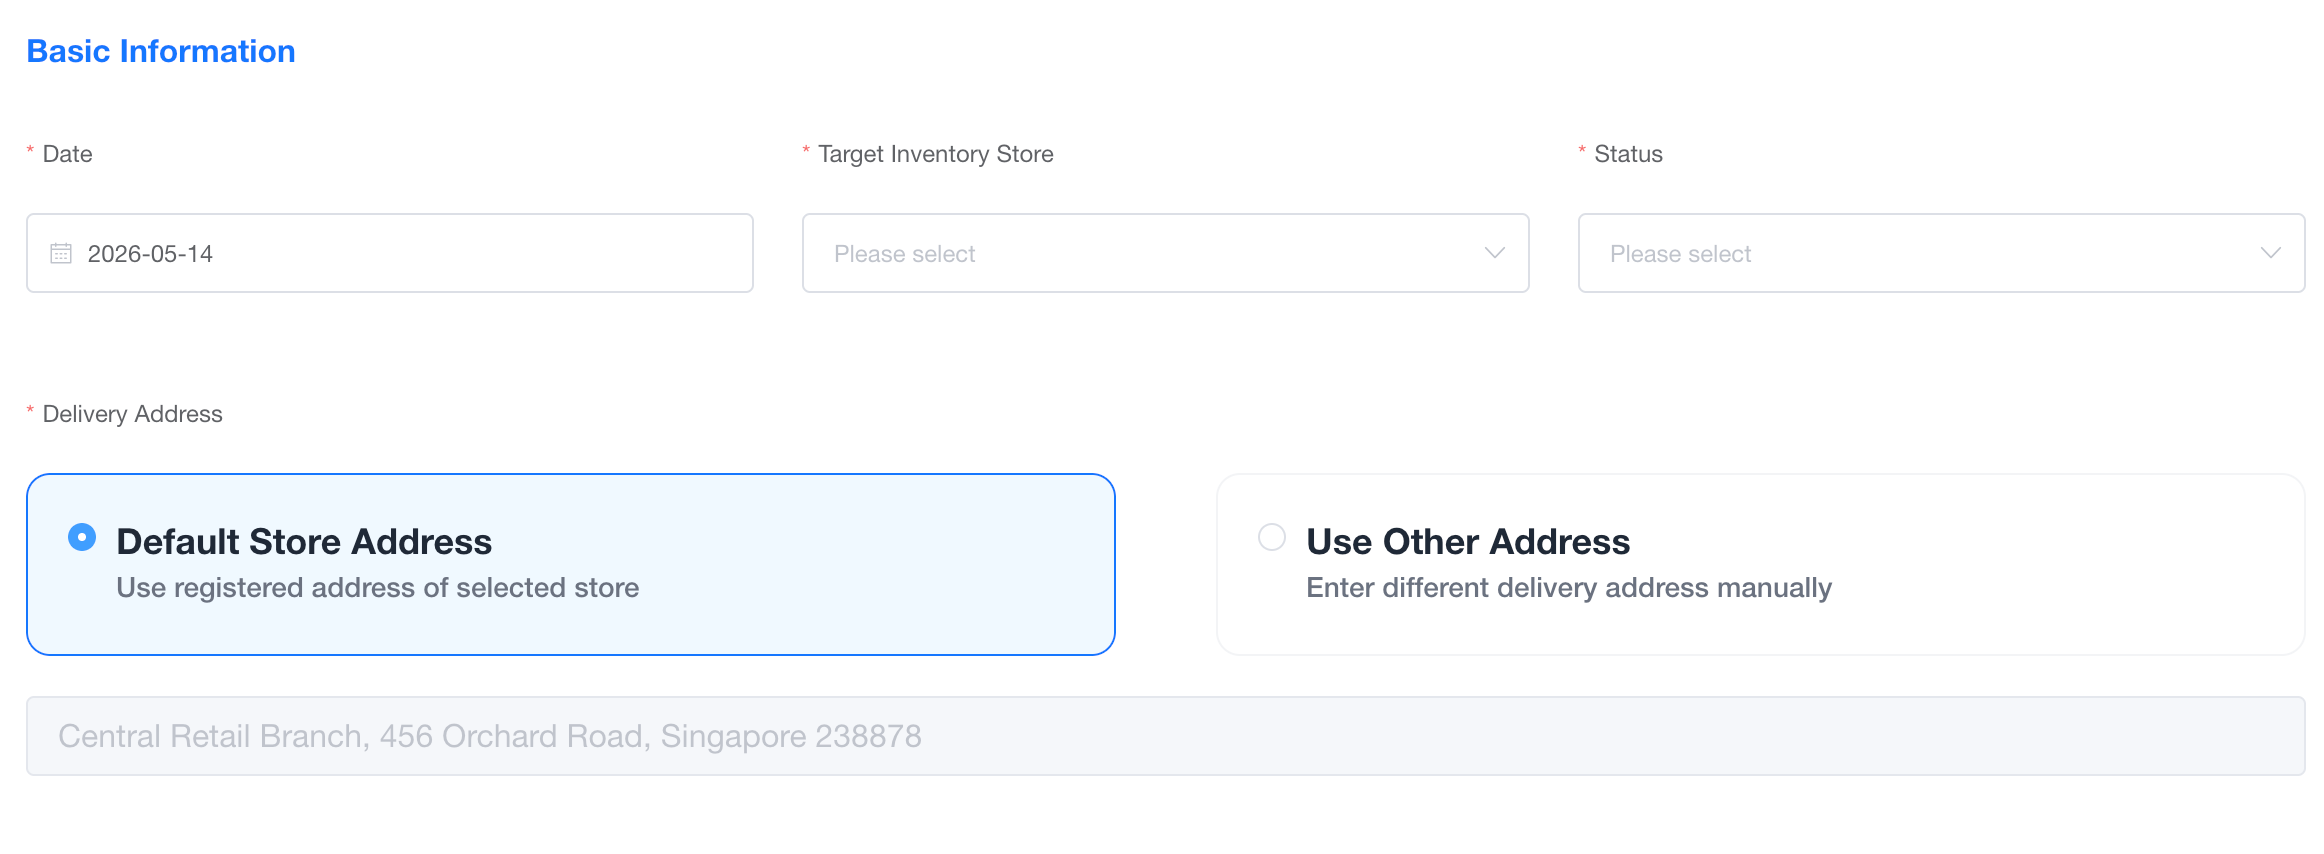 **Section 2: Supplier Selection 供应商选择** Link the order to a specific vendor from your pre-configured database. <br> 将订单关联到您预先配置的数据库中的特定供应商。 | Field/Action <br> 字段/操作名称 | Explanation <br> 含义与操作解析 | | :--- | :--- | | **Select Supplier** <br> 选择供应商 | **Required.** Choose an active vendor from the dropdown list. <br> **必填。** 从下拉列表中选择一个处于启用状态的供应商。 | | **Alias / Contact Person / Email** <br> 别名 / 联系人 / 电子邮箱 | Auto-filled by the system based on the supplier's profile data. <br> 系统会根据供应商档案数据自动带出这些信息。 |  **Section 3: Product Details 商品明细** Specify the exact items, quantities, and prices being ordered,It will change according to the operation nodes, for example, enabling the mandatory inventory quantity. <br> 明确订购的具体商品、数量和价格,会根据操作节点变化,例如开启必填入库量。 | Field/Action <br> 字段/操作名称 | Explanation <br> 含义与操作解析 | | :--- | :--- | | **+ Add Product** <br> + 添加产品 | Click to select items from your inventory list to add to the PO. <br> 点击从您的库存列表中选择商品添加到采购单。 | | **Clear All Products** <br> 清除所有产品 | Removes all current items from the order list with one click. <br> 一键移除订单列表中的所有当前商品。 | | **Product / Unit / Remarks** <br> 产品 / 单位 / 备注 | The item name, its unit of measurement, and specific item-level notes. <br> 商品名称、计量单位以及特定的商品级备注。 | | **Order Qty / Price** <br> 订购数量 / 单价 | Input how many units you are ordering and the agreed unit price. <br> 输入您要订购的数量和商定的单价。 | | **Order Amount / Action** <br> 订购金额 / 操作 | The system automatically calculates the line-item total. Use the Action column to delete specific items. <br> 系统自动计算单行项目总额。使用“操作”列可删除特定商品。 |  **Section 4: Upload File 上传文件** Attach supporting documents for compliance. <br> 附加支持性文件以确保合规。 | Field/Action <br> 字段/操作名称 | Explanation <br> 含义与操作解析 | | :--- | :--- | | **Upload File** <br> 上传文件 | Click or drag files to upload (Supports Image or PDF). <br> *Validation (校验):* If your selected Status has "Mandatory Attachments" enabled, you cannot submit the order without uploading a file here. <br> 点击或拖拽文件进行上传(支持图片或 PDF 格式)。<br> *校验:* 如果您选择的“状态”启用了“强制上传附件”,则必须在此处上传文件后才能提交订单。 |  **Section 5: Remark & Tax Calculation 备注与税费计算** Finalize notes and review the financial totals before submission. <br> 完善备注并在提交前核对财务总额。 | Field/Action <br> 字段/操作名称 | Explanation <br> 含义与操作解析 | | :--- | :--- | | **Remarks** <br> 备注 | Enter additional order information or global notes for the supplier. <br> 输入额外的订单信息或给供应商的全局备注。 | | **Tax (%) / GST (%)** <br> 税率 (%) / GST (%) | Enter applicable tax percentages. The system will compute the final values. <br> 输入适用的税率百分比。系统将计算最终数值。 | | **Order Amount (Subtotal/Total)** <br> 订购金额 (小计/总计) | The projected financial value based purely on what is being requested. <br> 纯粹基于请求订购量所计算出的预估财务价值。 | | **Actual Amount (Subtotal/Total)** <br> 实际金额 (小计/总计) | The finalized financial value based on physical receipt. <br> *Validation (校验):* If the Status requires "Mandatory Receiving Qty", this actual amount becomes the strict baseline for Finance to process payments. <br> 基于实际到货情况确定的最终财务价值。<br> *校验:* 如果状态要求“强制填写入库数量”,此实际金额将成为财务处理付款的严格基准。 | | **Cancel / Submit** <br> 取消 / 提交 | Discard the draft or confirm and save the Purchase Order into the system. <br> 放弃草稿,或确认并将采购单保存到系统中。 | 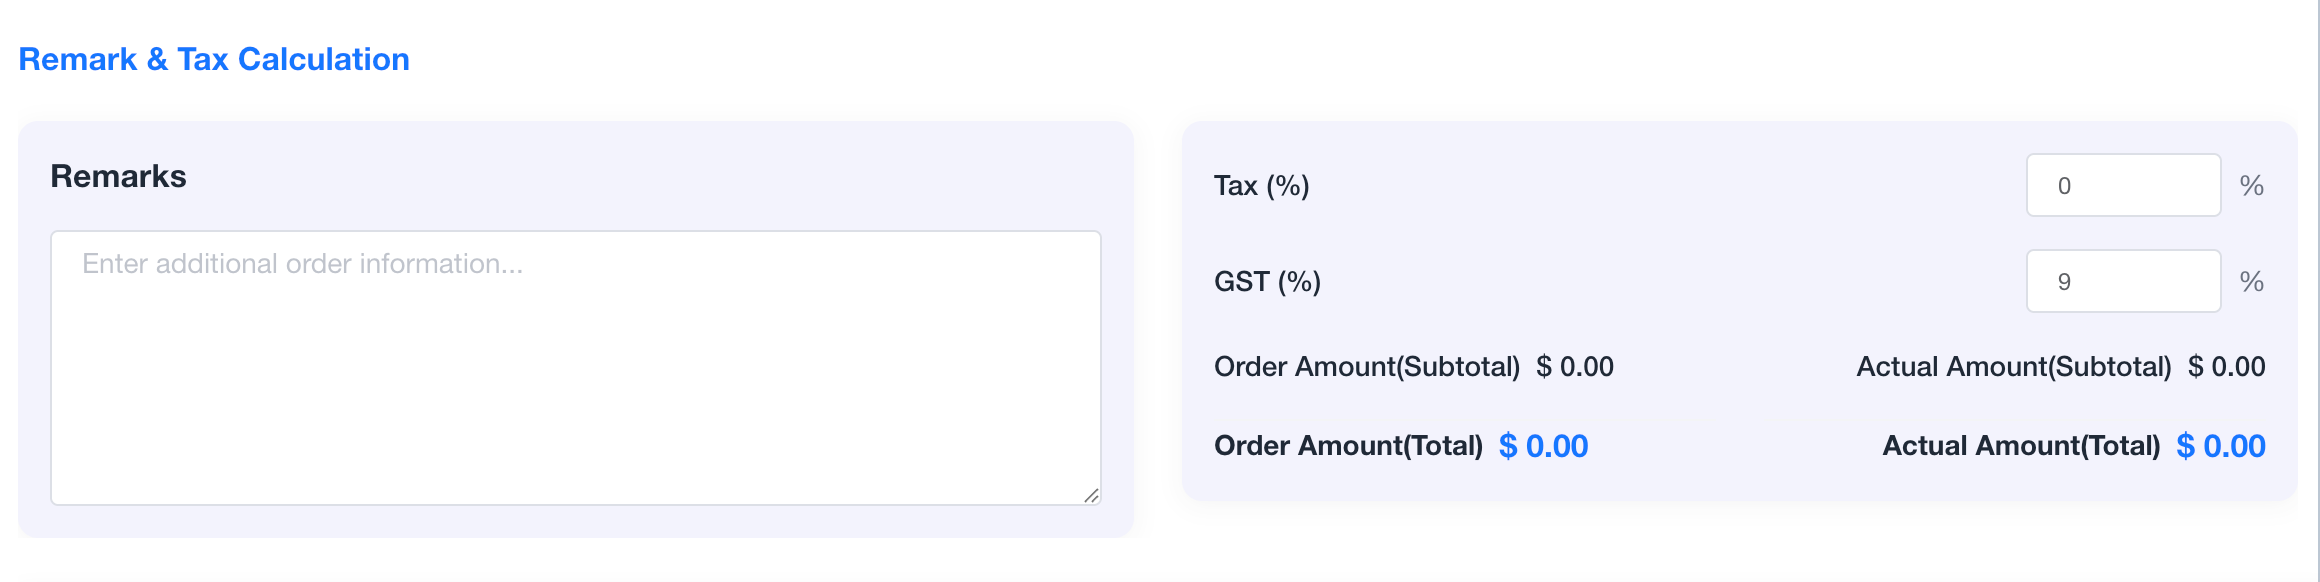 ### 2. Frequently Asked Questions (FAQ) 常见问题 * **Q: Why am I forced to upload an attachment when creating a brand new Purchase Order?** <br> **Q:为什么我在新建采购单时,系统强制要求我必须上传附件才能保存?** * **A:** This happens because you manually selected a status (e.g., "Received") that has the "Mandatory Attachments" node enabled in the backend settings. To proceed with the back-filling, you must provide the required documentation (like a Delivery Order or Invoice), ensuring strict compliance rules are met even during special case recordings. <br> **A**:这是因为您在新建时手动选择了一个在后台启用了“强制上传附件”节点的状态(例如“已入库”)。为了继续完成补录,您必须提供所需的文件(如送货单或发票),以确保即使在特殊情况补录时,也能严格满足合规性规则。 * **Q: I am logged in as a Branch Manager. Why can't I select other outlets when raising a PO?** <br> **Q:我以分店经理的身份登录。为什么我在建采购单时不能选择其他门店?** * **A:** For security and data segregation, branch accounts are strictly restricted to their own inventory operations. Only users logged in with Headquarter (HQ) credentials possess the cross-store authority to raise POs for other branches. <br> **A**:出于安全和数据隔离的考虑,分店账号被严格限制只能操作自身的库存业务。只有使用总店 (HQ) 凭证登录的用户,才拥有跨店为其他分店建单的权限。
pos
2026年5月14日 13:59
转发文档
收藏文档
上一篇
下一篇
手机扫码
复制链接
手机扫一扫转发分享
复制链接
Markdown文件
PDF文档(打印)
分享
链接
类型
密码
更新密码